Paving is the process of converting rough or unpaved surfaces into smooth and safe roads and driveways. It requires meticulous planning and careful execution.
The paving material chosen is usually asphalt. This is a mixture of aggregates (such as crushed stone or sand), binder, and fillers. The binder, which is made of asphalt cement, binds the aggregates together. Contact Paving Companies Long Island now!
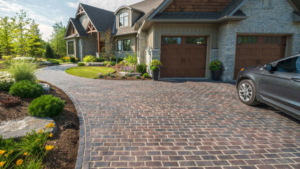
When it comes to building durable and long-lasting surfaces for walkways, driveways, roads, and parking lots, paving stones are a great option. They provide excellent durability and can withstand heavy traffic and harsh weather conditions. Paving stones are also easy to install and can be customized to suit different project requirements and architectural styles. But if you want to get the most out of your paved surface, it’s important to properly prepare and install it. In this blog post, we will discuss some of the steps that should be taken to ensure a quality installation and the longevity of your pavers.
The first step in laying paving stone is to remove any existing pavement and excavate the area. Next, the contractor will lay a layer of gravel and sand on the ground to create a base for the pavers. The amount of gravel and sand used will depend on the function of the paved area. For example, a paved area that will be used by standard motor vehicles may require only one inch of sand over four to six inches of gravel, while an area that will be driven on by large trucks may need up to two inches of sand over ten to twelve inches of gravel.
Once the sand and gravel have been laid, a notched screed board can be placed on top to level and smooth the sand. This is crucial because even a slight height difference can cause people to trip over the pavers. After the sand has been leveled, a final layer of sand should be poured over the entire area to lock the pavers into place.
While asphalt is a popular choice for road construction due to its cost-effectiveness and durability, concrete is the preferred material for paved surfaces because of its superior strength and durability. Concrete is a mixture of cement, aggregates (such as crushed stone or sand), and water that is mixed together and shaped to form the desired structure. It is then compacted and cured to form a solid, long-lasting surface. Concrete is a versatile material that can be colored and stamped to imitate the look of natural stone, brick, or other materials. It is also extremely durable and can be molded to fit around curves, islands, or other obstacles in the landscape.
Compaction
The compaction process is key to the success of any paving project. Compaction increases the bearing capacity of soils by rearranging and reducing voids creating densified soils. This decreases future settling of the soil and eliminates shrinking and swelling which can compromise the integrity of pavement structures.
Soil compaction is influenced by many factors some of which are environmental, some determined by mix design and structural layout and under contractor and agency control during construction such as the use of vibratory compactors or rollers. Various in-situ testing methods are available to assess the quality of the HMA such as sand cone, Shelby Tube and balloon density tests (ASTM D6938-08a). However, the most commonly used method to measure in-place HMA density is the nuclear gauge. This instrument uses a small amount of radioactive material such as cesium-137 at the end of a probe that is either inserted into or onto the in-place HMA. Nuclear gauges must be calibrated to the specific mix being tested.
When the base layer is placed on the prepared subgrade, it is compacted using a vibratory plate compactor which resembles a simplified push mower. It is essential to compact the base layer one thin layer at a time. If you compact too much at once, you may be left with uncompacted layers which can lead to pavers that are uneven and can cause the surface to crack.
After the gravel base has been compacted, a bedding sand should be placed in 1″ of thickness across the entire area. This sand will not require any compaction since the pavers, when installed, embed themselves in it, locking them in place. The bedding sand also helps to level the surface of the finished paver surface.
To help ensure that the sand layer is properly compacted, you should lightly wet it before running the plate compactor over it. This will make the sand particles stick together and provide a better foundation for the paving stones to set on. After the sand is placed, it should be tamped with the plate compactor to create a hard and even surface. Once the tamping is complete, you can begin to lay your paving stones.
Curing
Paving is a process that involves laying a hard durable surface such as concrete or asphalt over a natural surface. It is used to create a flat and even surface that is safe for vehicles to drive over. It also protects the underlying natural surface from weathering and erosion. Paving is commonly used for roads and driveways but can be used for other surfaces such as patios and walkways.
Paving can be made from a variety of materials including stone, clay, and concrete. Each type of material offers different advantages and disadvantages. For example, concrete is a very strong and durable material that can be formed into intricate designs and patterns. It can also be stained or patterned to resemble other types of materials such as stone or brick, which gives it a more attractive finish. Concrete paving is also very affordable and easy to maintain.
On the other hand, asphalt is a relatively soft material that is easily damaged by heavy traffic loads and harsh weather conditions. It is often used for high-volume primary highways because it is inexpensive and easy to repair. However, it is important to note that asphalt paving can be difficult to install and requires proper maintenance to ensure long-lasting performance.
Once the pavement has been installed and compacted, it must be allowed to cure. This process takes a minimum of one year, and is critical for the longevity of the paved surface. During the curing process, traffic should be kept off of the new surface as much as possible to avoid damaging it.
After the paving has cured, it is time to apply a protective coating. This is important to prevent fading and to help protect the paving from UV rays. It is also recommended that the paving be sprayed with a weed killer before applying the protectant. This will help to keep the weeds from growing in between the pavers and to make it easier to clean in the future.
Maintenance
Paving stone is a great way to add visual interest and durability to your home’s outdoor spaces. It is available in a wide variety of shapes, sizes, and colors to create unique designs that will complement your home’s architecture. While paving stones are generally more expensive than concrete or asphalt, they require less maintenance and can increase your home’s value.
Regular cleaning and care will keep your pavers looking their best. Start by sweeping the paved area daily to prevent dirt, debris and dust from collecting in between each brick. Sweeping regularly will also help to reduce the growth of weeds in the area. For more stubborn stains, use a surface cleaner or a pressure washer to remove moss, oil, efflorescence buildup, and other tough spots. If you choose to use a pressure washer, always test the water pressure in an inconspicuous area of your paving before using it on the entire surface.
Once the surface is clean, apply a light application of a mild cleaner. For more stubborn stains, such as those caused by oil or grease, it is a good idea to choose a cleaner that is specifically designed for paving stones. This will ensure that the cleaning agent is not damaging your paving stones.
To keep your paving stones looking their best, sweep them on a regular basis and occasionally wash them with a gentle cleaner. A pressure washer can also be used to flush out weeds that have grown between the paving stones. Be sure to rinse thoroughly to avoid washing away the sand that helps hold your pavers together.
Once the sand is washed away, it will need to be replaced. The sand can be replaced by digging out the old sand and applying a fresh layer of sand. This will make your paving stones look new again and will ensure that the joints are properly filled.